

A battle belt carries the gear you need to fight and to stay alive: magazines, a tourniquet, a medical kit and, if you carry one, your sidearm. It stays on your hips when the plate carrier comes off, and it puts weight on your waist instead of your shoulders.
There is no single best battle belt setup. What goes on the belt depends on the job, and the most common mistake is copying a full military loadout for a range day. This guide covers what every belt needs, where each item goes and why, and how the setup changes from a minimalist belt to a full loadout and when worn with a plate carrier.
What a Battle Belt Is (and Why Two Pieces)
A battle belt is a rigid outer belt worn over your trousers that carries pouches and holsters. Most modern belts are a two-piece system:
- An inner belt threads through the trouser loops and has Velcro on the outside.
- An outer belt wraps over it, sticks to the Velcro and carries the load.
The two pieces lock together, so the outer belt does not slide down or rotate when it is loaded and you are running, kneeling or climbing into a vehicle. The outer belt also comes off in one movement with all the gear attached.
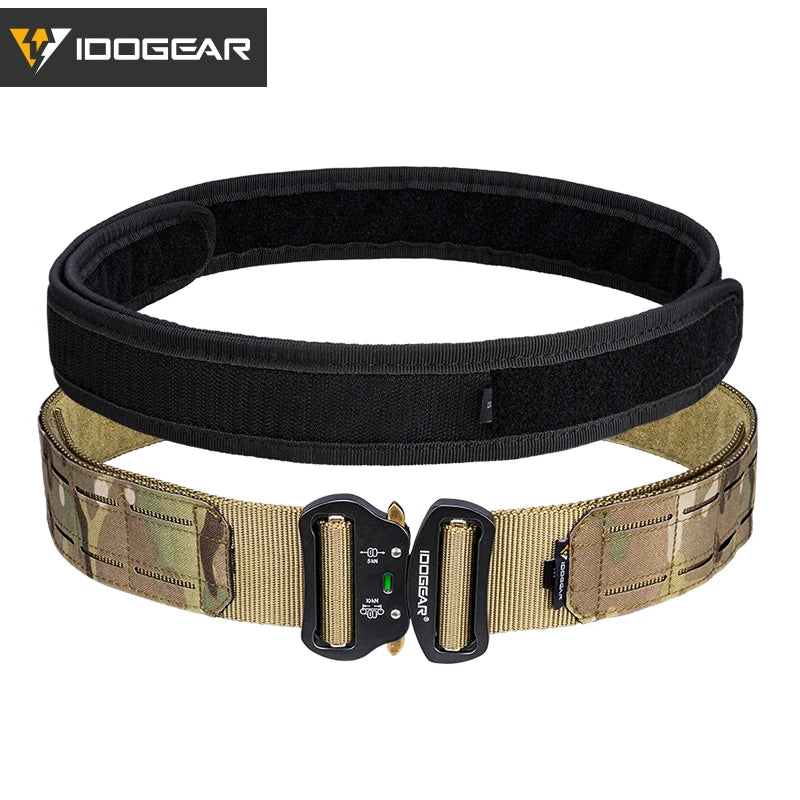
Two main types exist. A 2-inch two-piece belt with a load-rated buckle is slim enough for daily training and stiff enough for a holster, magazines and a medical kit. A wide padded "war belt", often with suspenders, spreads heavier loads across the hips. The IDOGEAR 2" two-piece belt we carry is the first type: an inner Velcro belt and a rigid outer belt with a Cobra-style metal buckle.
The Core Battle Belt Setup: What Goes Where
SOFREP's well-known guide sums up the purpose of a battle belt as two jobs: the gear that lets you fight, and the gear that lets you treat a wound. Everything else is optional. A complete battle belt setup starts with these items:
- Magazines for your primary weapon, your sidearm or both.
- A tourniquet, reachable with either hand.
- An IFAK, the individual first aid kit for treating yourself.
- A holster, if you carry a sidearm.
Add a dump pouch, admin pouch, knife or water only when the task needs it.
The positions below are for a right-handed shooter, with the buckle at 12 o'clock. Mirror them if you shoot left-handed.
| Position | What goes there | Why |
|---|---|---|
| 12 o'clock (front) | Nothing | You need to kneel, go prone and sit in a vehicle. A pouch at the buckle digs into your stomach and gets in the way. |
| 2–3 o'clock (strong side) | Holster | Natural draw. Leave the space directly behind it clear so nothing blocks the draw. |
| 9–10 o'clock (weak side, front of the hip) | Magazine pouches | Your support hand reaches them without crossing your body. Keep them on the hip, not at the front. |
| 7–8 o'clock (weak side, rear) | Dump pouch | Empties go in without looking, and it stays out of the way when you kneel. |
| 5–7 o'clock (back) | IFAK | A rip-away pouch can be pulled to the front for use. |
| Front of the weak side or near the IFAK | Tourniquet | It has to be reachable with either hand, including the hand on the uninjured side. |
Two rules matter more than the exact clock positions. First, keep pouches off the front of the belt: magazine pouches that creep towards the buckle are the most common reason a belt is uncomfortable. Second, keep everything tight. Loose straps, dangling pouches and gear that bounces when you run will snag or get lost.
All the pouches in the table are in our range: single and double magazine pouches, rip-away IFAK pouches, tourniquet pouches and foldable dump pouches. Our IFAK pouches are sold empty. For what goes inside, see What Is an IFAK?.
Battle Belt Setups by Use Case
Start with what you are going to do on the belt, not with how much space it has. Here are four common setups, from the lightest to the heaviest.
Minimalist, Slim and Low-Profile Setup
The minimalist battle belt setup carries only what you cannot do without:
- one tourniquet,
- one or two magazines,
- a compact IFAK.

It stays comfortable all day, does not catch on a car seat and works under an open jacket. A slim or low profile battle belt setup is the right starting point for most people: wear it for a few training days and add gear only when you notice something missing.
Civilian and Range Setup
The civilian battle belt setup adds the items that make a long training day easier:
- two or three rifle magazines,
- a dump pouch for empties,
- a small admin or utility pouch for a notebook, light or tools.
This is also the typical tactical battle belt setup for training courses, where you are moving and reloading but not carrying a full combat load.
Full Loadout: Army, Special Forces and USMC-Style Belts
Army, USMC and special forces battle belt setups carry a combat load for hours. Typical items are three or more rifle magazines, sidearm magazines, a full IFAK with a tourniquet, a dump pouch and sometimes a radio or water.
At this weight, many military users move to a padded war belt, often with suspenders, so the load does not pull the belt down. A 2-inch two-piece belt handles moderate loads well. If your full belt starts sagging or rubbing your hip bones after an hour, the load has outgrown the belt, not the other way around.
Police and Duty Belts
A police battle belt setup is built around a different list: handcuffs, OC spray, a radio and a less-lethal option in addition to the sidearm and magazines. Patrol duty belts follow department rules. A battle belt is usually worn by tactical teams over the uniform, with the same layout principles as above.
Color is the last decision. A black battle belt setup suits low-visibility and indoor work; a Multicam battle belt setup should match the plate carrier and uniform you wear it with.
Holster, Knife and MOLLE Placement
Holster
A battle belt holster setup has to work with the rest of your kit. A holster mounted directly on the belt can sit too high once you wear body armor, and the bottom of the plate carrier gets in the way of the draw. A full drop-leg holster swings and catches. Most users settle on a mid-ride or slight drop that puts the grip just below the carrier. Whatever you choose, practice the draw while wearing the plate carrier.
Knife
A battle belt knife setup puts a fixed blade where either hand can reach it, typically on the weak side, horizontally along the belt or behind the magazine pouches. It is an emergency tool for cutting straps or clothing, so access matters more than size.
MOLLE on a Battle Belt
A MOLLE battle belt setup uses the same PALS straps as a plate carrier. Each pouch strap weaves through the pouch and around or through the belt, so it does not slide. Two practical points:
- Check the strap length. MOLLE straps are made for 1-inch webbing rows, so they need to be long enough to go around a 2-inch belt.
- Leave gaps. Pouches packed edge to edge bend the belt into a straight line and stop it following the curve of your hips.
How the webbing and straps work is explained in our guide What Is MOLLE?.
Battle Belt Setup With a Plate Carrier
Most people who own a battle belt also wear a plate carrier, and the two have to work together. A battle belt setup with a plate carrier follows three rules:
- The belt sits below the carrier. The bottom edge of the carrier and its cummerbund should stop above the belt pouches. If they overlap, the carrier pushes the pouches down and you cannot reach the magazines.
- Split the load. Moving some magazines from the chest to the belt frees space on the carrier and lowers your center of gravity. If the carrier holds your rifle magazines, the belt can carry sidearm magazines, the IFAK and the dump pouch.
- Keep the front clear. With a carrier on, any pouch at the front of the belt hits the bottom of the plate when you sit or bend.
If you are still deciding what to wear on the chest, see Chest Rig vs Plate Carrier.
Test Your Setup Before You Rely on It
A belt that looks good on the table can fail the first time you move. Put on the full kit, including the plate carrier, and run through five checks:
- Kneel and go prone. Nothing presses into your stomach or hip bones.
- Sit in a car seat. The rear pouches do not push you forward.
- Reach for the tourniquet with each hand. If one hand cannot reach it, move it.
- Reload without looking. Your hand finds the magazine pouch every time.
- Wear it for a full training day. Weight that seemed fine for ten minutes becomes a problem after six hours.
Expect to move pouches two or three times before the setup settles.
FAQ
How many magazine pouches should a battle belt have? As many as the task needs. Two is a common starting point for a minimalist belt and three to four for a full loadout. If the plate carrier already holds your rifle magazines, the belt can carry fewer.
Do I need suspenders? Not for a light or medium setup on a two-piece belt. They help with heavy loads, especially on wide padded belts that would otherwise slide down.
Can I use a regular trouser belt? A stiff gun belt can carry a holster and a magazine or two, but it will twist and sag under a full set of pouches. A two-piece battle belt is built for that load.
Where does the tourniquet go? Where both hands can reach it, usually at the front of the weak side or next to the IFAK. Wherever it goes, mark it and keep it in the same place every time.